|
This page was originally part of the Jarviser Home Hubs Files. They are now housed here at FileSaveAs to help users of the BT Home Hub. |
Note Feb 2008: Simplified version for non-technical people, using the bare minimum of changes and with minimal additional information.
If you are more expert or have the V 2.0 hub see the original article
Important! This article assumes that the master hub has a default range of acceptable
IP addresses of 192.168.1.1 through to 192.168.1.254 just like a Home Hub. Your master hub may have a different range like 192.168.0.1 thru 255 in which case the slave IP address in the article 192.168.1.175 will need to be changed to 192.168.0.175 for example. Check your documentation or Google it!
Printing this article: if it does not page properly,
print in sections. or try latest Opera browser for Windows which seems to
behave better.
This page also available as a pdf document
If you have a spare Home Hub and any type of broadband modem with an
ethernet connection you can convert the home hub to add Wi-Fi to your main
modem.
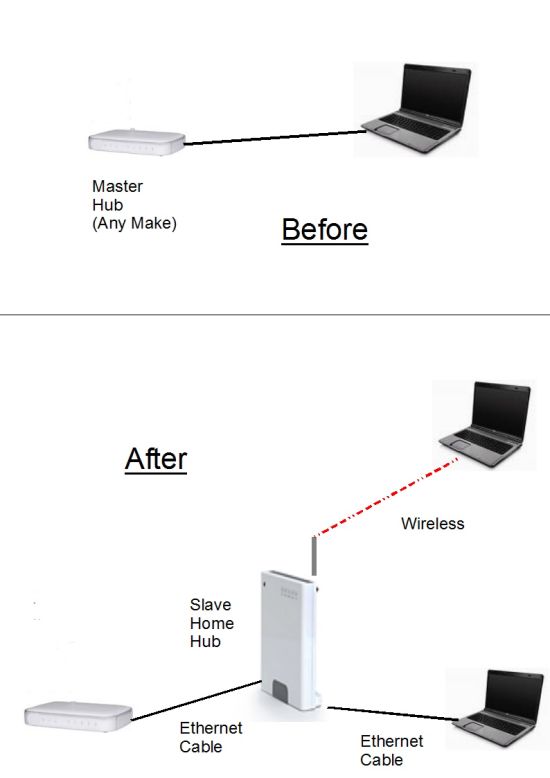
The diagram shows the typical end product. If you didn’t already have
Wi-Fi on your broadband this will give it to you
Follow the instructions to the letter – you do not need technical
skills to do this. If you mess it up, reset the Home Hub and start again.
I’ll tell you how later.
I would strongly recommend that you first set up
the PC’s ethernet “network connection” with a fixed IP address of 192.168.1.100
subnet of 255.255.255.0 Gateway of 192.168.1.254 and DNS of 192.168.1.254
That process is described fully in step 6 of the technical article
Lock Home Hub to 6.2.2.6 – You don’t have to
do it if you follow the instructions step by step, but people try to unplug
the slave at the wrong moment or vary the sequence, and a PC with a fixed IP address is much
more forgiving in that instance!
The setup
The sequence is important if you want it to work first time!
I shall be referring to the box that the broadband supplier provided
you with as the “Master Hub”. The spare BT Home Hub a the “Slave Hub”. This
is in case your main hub is also a Home Hub!
To start
You will need an extra ethernet cable. One is usually
supplied with the Home Hub. You can buy them at any PC shop, but do NOT buy
a “Crossover cable”, you need a “Straight” ethernet cable. The difference
is not important here, just get the straight one.
NB – Do NOT plug the Slave Hub into the phone socket! Your Master hub
should remain connected to the phone and switched on as normal.
Plug the Slave Hub into the mains supply and let it settle for 5
minutes.
Unplug all other non-essential equipment from you PC so that it is
“Stand Alone” but do not switch it on yet. If you can switch off the wifi
easily do so now.
Set up Slave Hub
Connect the ethernet cable into the yellow socket marked “Ethernet 1”
on the Slave Hub. Plug the other end of the ethernet cable into a similar
shaped socket on your PC. It will not fit into the wrong socket, but you
may also see a similar symbol to the one next to the Slave Hub’s
ethernet socket.
Press the power button of your PC to switch it on, and let it go
through its normal sequence til you get your desktop.
You will have the Data light of the slave hub illuminated. You may
have the wireless light on also, but ignore that.
The next requirement is to “Reset” the slave hub. On the original
shiny Home Hub (shown above) do this by holding in the wireless association
button on the back (There’s only one button on the back of the original
Home Hub) for 15 seconds or so, until all lights come on in a row and an
audible click is heard. Then release the button and wait for the data light
to come back on steady.
If you have one of the new (2007/8) smaller V1.5 hubs with three
buttons on the side, resetting is a slightly different process. You hold in
the recessed “Reset” button for 3 seconds, then release as above.
Now we will make the software changes to the Slave
Hub. These can be reversed at any time by doing another reset, so you will
not break it.
Bring up your Internet Explorer (or whatever other Browser you use
such as Firefox)
In the browser address bar where you would normally type in an
internet address, type in
http://192.168.1.254 (That number is what is known as an “IP
Address”) and hit Enter. This will take you into hub’s administration
system.
You may get a screen saying that the hub is not connected to the
internet. Do NOT hit the “Try Again” button, but re-enter the address as
above and hit enter again to get the slave hub’s Admin system.
If you have a later version of the hub’s software you may see a box
like this.
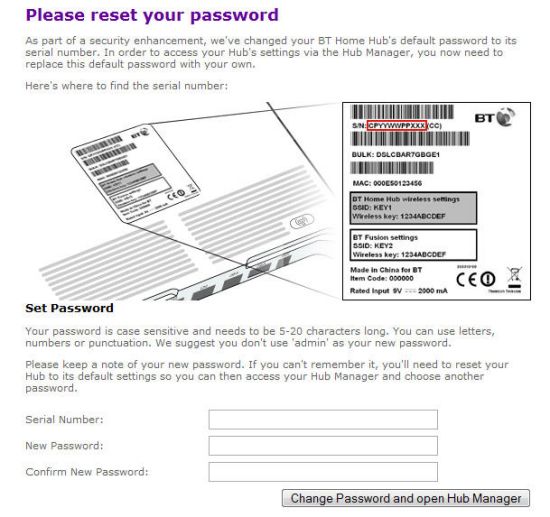
In which case take a look at the label on the back of the Hub where the
serial number is printed, and enter the first 11 characters of that serial
number in the first box, then put in a new password of your choice
(e.g. fredblog99 ) in the
second box, and the same new password again in the third box, and click the
“Change Password…” button.
NB. Take care with the letters and numbers of the serial number. Zero
has a diagonal line through it, U and V look similar, and make sure to use
capitals or lower case as appropriate.
When you have changed the password, on the left of the screen you
will see a blue option Advanced
Click on
Advanced , then when the screen changes click on
Continue to Advanced
If you had an older version of the hub software that doesn’t use the
serial number to reset the password you will now see a box that asks for
your Name and a Password, in which case you should enter
admin in name box and
admin in the password box.
If you have later software you may still get asked for password, in which
case it will be admin in name box and
fredblogg99 in the password box.
You will now find yourself in the advanced part of the hub’s admin
system. Whichever version of the software your hub has, you will see a list
of options down the lefthand side of the screen.
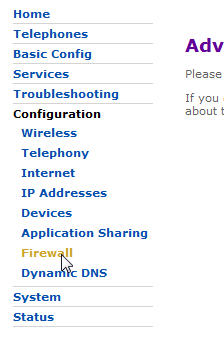
One of these options is
Firewall
Click on firewall and you will see a list of firewall settings, and
the “Standard” setting will already be selected.
Click on
Disabled setting instead and click on the
Next button, or the
Apply button if it has one.
When it has accepted the change (takes a few seconds) look at the list of
options on the left again and Click
IP addresses
You will see a small box next to “Use DHCP Server”.
Click the mouse in this box so the tick disappears.
Then click on the
Apply button.
After a few seconds when the screen has accepted the
change, look further down and you will see a section marked “IP Addresses”.
Click on IP Addresses
There will be three IP Addresses, and below that two blank boxes for
adding new IP addresses, with an “add” box next to them.
Type
192.168.1.175 in the first box and
255.255.255.0 in the next box and then click on the
Add button, and wait a few seconds.
What we have done here is to give the hub an alternative access
address to use with your browser, so we will now access it via that new address.
Go to the browser address bar again and overwrite the address you see
with
http://192.168.1.175 and hit enter or click Go.
You may get a screen saying that the hub is not connected to the
internet. Do NOT hit the “Try Again” button, but re-enter the address .
Click on
Advanced , then when the screen changes click on
Continue to Advanced
You will be asked for a name and a password again.
User Name is
admin and Password is either
admin or if you entered a new password earlier in this process, use
that new password (e.g. fredblog99 ).
Click on
IP Addresses.
You will now see four IP addresses instead of three, with the
new one you just added at the bottom of the stack.
Delete the top 3 by clicking on the
Delete next to each address, starting from the top, and just
leaving 192.168.1.175 remaining.
NB At some point when you delete one of the addresses you will get
a warning that you will lose connectivity. Don’t worry, just click on
OK because you will not lose connectivity (at this point we have
confused the Hub sufficiently for it to say silly things)
Last steps
Switch off the PC.
(The Master Hub should already be switched on at this point).
Disconnect the ethernet cable at the PC end and plug it into a spare
ethernet port in the Master Hub.
If you only have one ethernet port in the master hub use that one.
Plug another ethernet cable into the PC’s ethernet port and plug the
other end into another ethernet port on the Master Hub, or if there isn’t a
spare one, plug it into Ethernet 2 port on the Slave Hub. The diagram above
shows the final setup for a TalkTalk master modem with only one ethernet
socket.
Switch on the PC and wait for it to boot up as normal. Switch the wifi
back on if you switched it off earlier.
Now start using it!
The PC should work exactly as it did before.
Now however you can connect up to five more PCs by wireless
connection.
If the PCs to be connected wirelessly have the BT wireless connection
software you can use that method. (see
here)
PCs with Windows can use their normal Wireless connection method
which I will not go into here, but you will need the Wireless key printed on the
back of the hub label to gain wifi access. Note that the Home Hub gives
the wireless or “WEP” key in “Hex” or “Hexadecimal” format – you don’t need
to know what that means but you
will need that information when you connect.
Vista/Windows 7 – when using Vista/Win7 to connect wirelessly, it can take one or
two minutes to complete the connection, starting with “Local Access Only”,
before getting an internet connection. Just leave it til the Notification
Area icon gets its little blue ball.
Note:
If you want to connect to the slave again directly without the master hub in the
network, you must set up
the PC’s ethernet “network connection” with a fixed IP address of 192.168.1.100
subnet of 255.255.255.0 Gateway of 192.168.1.254 and DNS of 192.168.1.254
That process is described fully in step 6 of the technical article
Lock Home Hub to 6.2.2.6
Advanced
OK now you have successfully mastered this little “hack” (yes, you are now
officially a hacker!) You can think about increasing the standard Wi-Fi
security by changing to WPA-PSK security, and changing the SSID.
BT do a perfectly adequate
guide
on WPA-PSK.
Related Content
- Use a second Home Hub as a Wi-fi repeater
- Three BT Home Hubs in Three Houses
- Use a spare v1 Home Hub as a Wi-fi Dongle
- Use Broadband Talk on a Slave Home Hub
|
Page created by "Jarviser" & hosted by FileSaveAs. See the Jarviser Home Hub Index Page If you’ve found the content of this page of use, and want to say thanks, Jarviser’s charity of choice is Great Ormond Street Hospital. Please visit their site to make a donation Got a question about the BT Home Hub? Please ask in the FileSaveAs Home Hub Forum Disclaimer: Content on this page was not originated by FileSaveAs, and is hosted ‘as-is’ as a service to Home Hub users. FileSaveAs accepts no responsibility for the content on this page. Visitors use information on this page at their own risk. Contents may not be reproduced without permission. Original copyright for content on this page rests with Jarviser unless otherwise stated. FileSaveAs Site Terms apply. |