|
This page was originally part of the Jarviser Home Hubs Files. They are now housed here at FileSaveAs to help users of the BT Home Hub. |
If this article does not print properly, it is also available as a pdf document.
You might also like to copy the blue Telnet Summary instructions at the end of the page into a .txt document saved onto your computer so you can run the commands without typing them all in when you are offline!
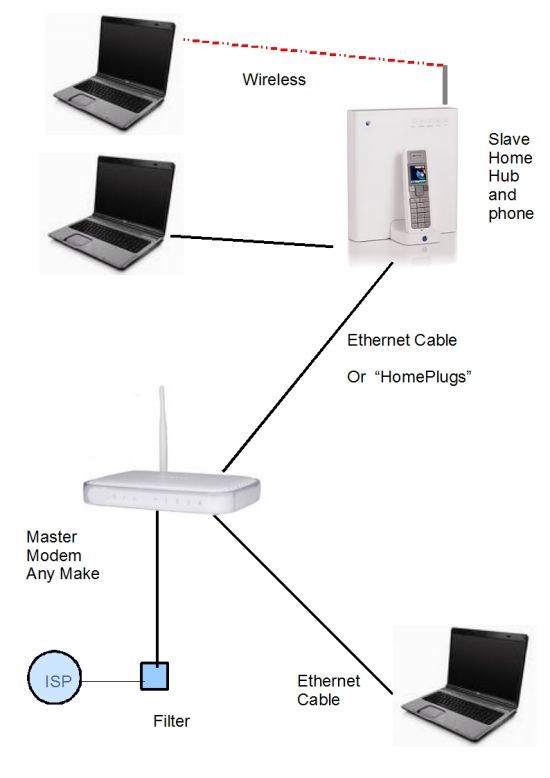
This is similar to my Telephony on slave with BT main hubarticle but using a non-BT router/modem as the ADSL connection.
I have written this article assuming you are someone who wants to use a third-party modem router on the ADSL but still want access to Broadband Talk.
I am using a Netgear DG834G v4 which I bought from the BT Shop! That uses a base IP
address of 192.168.0.1
I also use DGTeam firmware
version 0849 which is highly customisable, but I have not opened up
any special ports or customised it for this purpose.
If you use another main router modify the instructions to suit, noting
your router/modem’s home IP address.
This will NOT work to give you landline calls!
Suitable slave hubs.


The process has been tested on different Version 1 and Version 1.5
slave hubs (see the caveats for V 1.5 hubs in the 6.2.2.6 web page) but
will NOT work on a Version 2 hub. That hub cannot be accessed by Telnet.
The aim
is to get access to Broadband Talk telephony on the slave
hub by changing the configuration of the slave hub settings, and then
configure the slave for BBT using a copy of the “configuration text” (my
phrase) normally used on a master hub and obtained from www.bt.com/bbt.
The important feature is that it allows BT customers to use Broadband
Talk telephony whilst using a router/modem of their choice as the main
broadband gateway if for some reason they don’t like the Home Hub in that
role. for example you are a gamer or want a decent router you can control!
Sequence of operations
1. Capture the “configure to Broadband Talk”
configuration text
2. Convert slave to 6.2.2.6 and create Root user with full Telnet
access.
3. Disconnect and convert to wired slave operation.
4. Reconfigure telephony to work on local network.
5. Configure the slave hub BBT phone connection.
6. Backup the configuration file
Many of these steps use TELNET – you may have to add Telnet Client in
your Add Windows Features options (Method varies with Windows versions)
1. Capture the Configure BBT text
To do this you need FIREFOX
browser because of the advanced properties management.
You can do this next operation with a master hub of whatever make,
but remember not to actually click on the configure, stop at the right
click as described below.
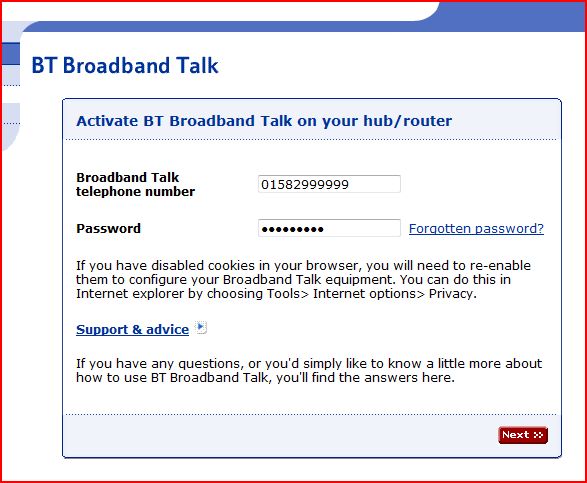
Enter
www.bt.com/bbt in your browser.
Input your BB Talk number and BB Talk password.
Click “Next”
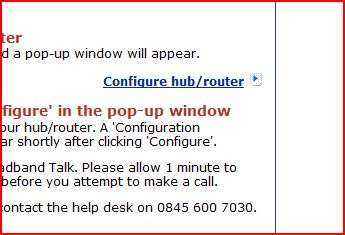
Click on
Configure hub/router
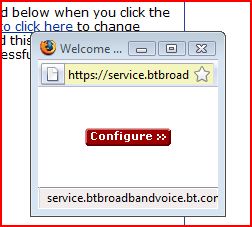
This is where Firefox comes into its own because of the enhanced
Right-click functionality
Right -click on the red Configure button – do
not left click on it.
Click “Copy Link Location”
Open NOTEPAD and paste the link location with Ctrl-v.
The text will begin
“http://api.home/voipsetup.api?
SIPTransportProtocol=UDP&SIPTransportPort=5060&”
Save this as a text file, eg VOIP.txt and close out of the browser
windows using the X in the corner.
2. Convert slave to 6.2.2.6
Lock BT Home Hub to 6.2.2.6 shows how to do that. It is
the trickiest part but I have done it many times and you may have to keep
trying if it does not succeed at first.
You will need the
Root user (
jarvis3r in my example) for the telnet session below.
3. Convert hub to wired slave operation
At this point you will have
a PC with a fixed IP (192.168.1.100 etc) connected to the home hub by
ethernet cable. Now go to Repeater Hubs Wired which shows you how to turn off the DHCP and firewall, and how to change the IP address of the
home hub, however in this case you change it to 192.168.0.175
to match the Netgear’s base.
At this point you will lose contact with the slave because of the
change of IP address. You must now change the static IP of your connected PC to
192.168.0.100 subnet 255.255.255.0 before you can re-establish communication
wit the slave hub for step 4.
I strongly advise either turning off the slave’s Wireless interface
or alternatively increasing the wireless security to WPA-PSK. Version 1
hubs default to WEP security which is weak encryption.
4. Configure telephony to work on local network
The
idea is to change VOIP functions to default to LocalNetwork instead of
Internet. You also need create and to point to the internet Gateway address
which in the case of the Netgear DG834G is 192.168.0.1
This process uses Telnet like the previous steps 2 and 3.
In your start menu get a DOS window
(XP do start/run/cmd, in Vista or Windows 7 do Start then type “cmd” in the search
box and click on the underlined “cmd” at the top of the pane.
In the DOS window type in
telnet 192.168.0.175 (or whatever the slave IP is)
Log in with the Root user and password that you created in the “lock
into 6.2.2.6” process (e.g. jarvis3r and jarvis3r)
You will then have a telnet session with full privileges.
If your master hub is a Netgear (or any other router/modem
using 192.168.0.1 as the base IP), highlight the text
below with your mouse, and then copy with Ctrl+C.
(If your master hub is another BT Homehub, replace 192.168.1.0 with 192.168.1.254)
:ip rtadd dst=0.0.0.0 gateway=192.168.0.1 intf=LocalNetwork
:dns client dnsadd addr=192.168.0.1
:dns server config WANDownSpoofing=disabled
:dns server route add dns=192.168.0.1 intf=LocalNetwork
:voice config intf=LocalNetwork
:system config defaultconnection=LocalNetwork
:config save filename=user
(The colons allow the telnet commands to be pasted in as a “script”)
Right click on the header of the telnet window and select
Edit>Paste
You will find all the commands entered as a batch script with the
save filename command outstanding.
Hit ENTER and after a few moments the prompt will return and you can
enter EXIT to leave telnet.
5. Configure the slave hub BBT phone connection
Open your
previously saved VOIP.txt file in Notepad
Change
“http://
api.home /voipsetup.api? ” to
“http://
192.168.0.175 /voipsetup.api?” (or whatever the IP of your slave)
Highlight the entire text and Ctrl+C to copy it, then in your Browser
paste the text into the address bar (where you normally put a website
address) with Ctrl-V, and then hit enter.
You should get “Configuration Successful”
I suggest you save this configuration page as a Bookmark or Favorite
or create one as in the Troubleshooting below.
Connect and reboot
Connect the slave hub and the master hub together using an ethernet cable
between ETH1 on the slave and any ethernet on the Netgear.
Boot sequence is important:
First Reboot the Netgear Hub and wait for the lights to settle.
Next Reboot the Slave Hub. This will take longer!
You should get a phone light on the slave hub and a BBT dial tone on the
hub phone.
HUB TIME:
You do need to set the time manually in the hub’s Advanced Settings System
menu.
Troubleshooting
You know what home hubs are like – mind of
their own, well sometimes mine loses the phone light, perhaps more often
than the main hub does. To make it easier to reconfigure you might like to
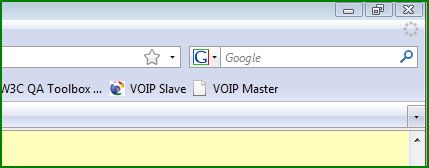
create a Bookmark (Firefox – see pic) or a Link (Internet explorer) on the
browser menu bar and paste the config text into the properties so that you
can reconfigure the phone with a click.
If you lose connection try rebooting the slave, especially if the Netgear
has been rebooted .
6. Backup Configuration
The beauty of 6.2.2.6 with root access is
that you can now save all this configuration
In your browser type the address of your slaved hub (e.g.
http://192.168.0.175 )select Advanced then Continue to Advanced,
(log in with the root account
jarvis3r not admin) then in System select Backup Configuration.
Hit the backup text and save your user.ini somewhere safe where you
can restore it in case of having to do a reset
Summary of Telnet commands
For returning experts I reproduce the
sequence below for NETGEAR main router using standard 192.168.0.1
Set PC with static IP of 192.168.1.100 subnet 255.255.255.0 Gateway and DNS
192.168.1.254
On a fully reset V1 hub on 6.2.2.6 firmware to create the Root ID
and lock against upgrading by BT …
telnet 192.168.1.254 (use admin and admin)
copy and paste… (you may have to do each line separately)
:script add name = pwn command = “user add name = jarvis3r password =
jarvis3r role = root descr = r00t”
:script run name = pwn pars = “”
[hit ENTER]
exit [hit ENTER]
telnet 192.168.1.254 (use jarvis3r and jarvis3r)
copy and paste…
:cwmp config state=disabled
:cwmp config periodicInform=disabled
:config save filename=user
[hit ENTER]
exit [hit ENTER]
Then in the admin system change main IP to 192.168.0.175 and switch
off DHCP and Firewall
Then to set up telephony on the slave…
Set PC with new static IP of 192.168.0.100 subnet 255.255.255.0
Gateway and DNS 192.168.0.1
Telnet 192.168.0.175 (use jarvis3r and jarvis3r)
copy and paste…
:ip rtadd dst=0.0.0.0 gateway=192.168.0.1 intf=LocalNetwork
:dns client dnsadd addr=192.168.0.1
:dns server config WANDownSpoofing=disabled
:dns server route add dns=192.168.0.1 intf=LocalNetwork
:voice config intf=LocalNetwork
:system config defaultconnection=LocalNetwork
:config save filename=user
[hit ENTER]
wait…
exit [hit ENTER]
Don’t forget to run the VOIP text in the Browser to configure BBTalk in the
hub. Also set the time in System settings.
Related Content
- Use a second Home Hub as a Wi-fi repeater
- Three BT Home Hubs in Three Houses
- Four BT Home Hubs in One House
|
Page created by "Jarviser" & hosted by FileSaveAs. See the Jarviser Home Hub Index Page If you’ve found the content of this page of use, and want to say thanks, Jarviser’s charity of choice is Great Ormond Street Hospital. Please visit their site to make a donation Got a question about the BT Home Hub? Please ask in the FileSaveAs Home Hub Forum Disclaimer: Content on this page was not originated by FileSaveAs, and is hosted ‘as-is’ as a service to Home Hub users. FileSaveAs accepts no responsibility for the content on this page. Visitors use information on this page at their own risk. Contents may not be reproduced without permission. Original copyright for content on this page rests with Jarviser unless otherwise stated. FileSaveAs Site Terms apply. |