|
This page was originally part of the Jarviser Home Hubs Files. They are now housed here at FileSaveAs to help users of the BT Home Hub. |
To print this article please use mouse to select page in suitable sections. Print each section using the File/Print at the top of this screen, then select “print selection” (or similar) from your printer’s options just before you print.
The best reason to roll back Version 1 hubs to 6.2.2.6 is for additional flexibility in using V1 hubs as slave hubs (i.e. Wireless access points and switches). The V1 hub was designed to use 6.2.2.6.
There is also less reason to lock into 6.2.2.6 since the 6.2.6.H firmware was introduced with most of the wifi bugs removed.
Some people however have suffered frequent resets, difficulty in getting wifi access to the hub without changing the channels manually or generally fiddling with the wireless config. Others simply want access to the
user.ini config file.
You might therefore try rolling back to version 6.2.2.6 and locking it there. It is locked there by virtue of disabling the firmware upgrade service in the hub. This can be done on 6.2.2.6 because Telnet still works
on that version. BT took out Telnet from later firmware to stop people doing this kind of fix, and from getting non-BT VOIP services by changing the references in the configuration with telnet. When logged-in the hub
with the newly created Root ID (instead of admin/admin) there is a config save and restore in the System menu. The user.ini file can be edited in Notepad then restored to the hub, but you must be logged-on as the Root ID you create below.
It is also possible in some cases to use 6.2.2.6 firmware for Non BT ISPs
like Be by modifying the config file with different logon name and other
minor setting changes (there’s an example of Be Broadband config
at the end of the article
but please don’t ask me specifically about your ISP – I just don’t know!)
Anyhow here is how to do the reflash and lock.
Warnings
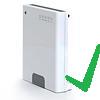

Hub V1 (far left) This hub was designed to use 6.2.2.6 and you should rarely
have any problems if you follow the instructions, but accidents do
happen and you should attempt re-flashing with old firmware at your own risk.
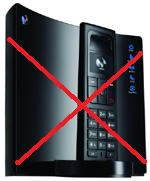
Hub v1.5 Whereas I have downgraded a V1.5 (shown second left)
to 6.2.2.6, the lights
do not map correctly. I also had to RESET the 1.5 hub before it would
connect.The RESET function on the V1.5 running 6.2.2.6 reverts to the Wireless
Association button as on the V1, to be held in for 15 seconds until the
relay clicks. The recessed Reset button is not enabled on 6.2.2.6!
Power light doubles up as Data (Ethernet) light, turning from red to orange,
and phone light lights up green with Wifi.
I have not been able to determine what the other lights do as I dare not
connect it in this state to my fragile BT broadband.
However the v1.5 does work OK as a slave on 6.2.2.6 and the wifi works.
Lights on slave connected on ethernet when setup will be
Orange – Red – Off – Green – Off. Work that out!
The Recovery Mode operation on V1.5 seems to be as on the V1 – i.e. Hold in Wireless
Association button, pull power, put in power and hold WA button til lights
flash. Red flashing power light seems to be indicating recovery mode as it
does on the V2.0.
All-in-all though, the V1.5 does not seem “happy” with
6.2.2.6!
Hub V2.0 The V2.0 can only be reflashed with modified firmware using
hardware (JTAG) methods. See my hub index links section.
Vista and Anti Virus/Firewalls
You may find that certain versions of Vista, especially in combination with some
anti-virus products, will not allow the recovery tool to work. My Vista
laptop with Kaspersky Internet Suite will not run these recovery programs,
neither the Speedtouch one, nor the BT revovery tools. However I have received
information from a guy with Vista SP1 and BT’s Norton installed and it runs the tools
just fine.
Downgrade
Firstly get the 6.2.2.6 zip file from Here and the instructions pfd file from
Here
What you will need
- The software recovery tool from the site above.
- A USB memory stick of at least 16Mb
- An Ethernet Cable
- A PC with Windows (I’m not experienced with Mac, sorry) and an
Ethernet port - A V1 Home Hub, Black or White.
Standard Method
Hub should be disconnected from the DSL line.
- First download the recovery tool as a .zip file to anywhere on your PC
- Open the .zip file and Extract to the USB Memory Stick
Only have the following files and folders in the USB drive without
their parent folders. It’s really important not to have long filenames.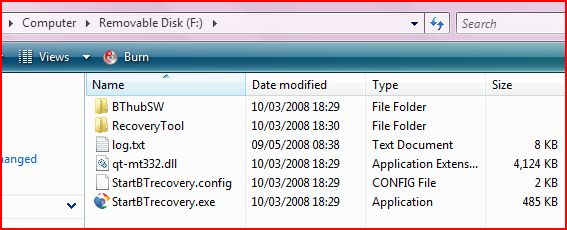
Do NOT unzip the tool into your “My Documents” folder . The recovery
tool only supports filenames up to 128 characters, and if you unzip it into
a folder in your My Documents system the name length may exceed
this and the tool will fail at about 16% through stage 1. - Power up the Hub and
Resetit. If you are
downgrading from 6.2.6.E or higher, you should go into the hub’s admin
system at http://bthomehub.home and follow the instructions to change the
password to xxxxxxxx - Connect the PC’s ethernet port to the
Ethernet 1 port of the hub. Ethernet 2 will NOT WORK!
The PC should have any wi-fi disabled and no other network connections. - Power up (or restart) the PC.
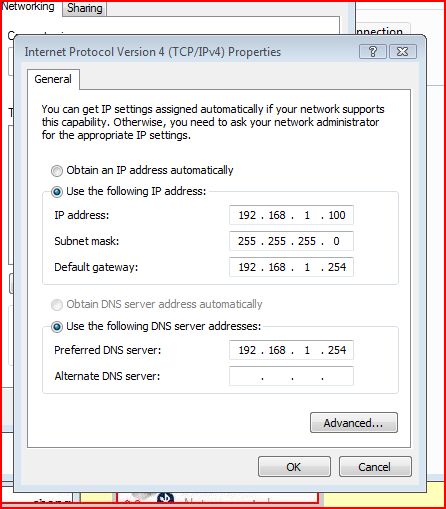
- Set the IP address of the PC as follows
IP should be 192.168.1.100
Subnet 255.255.255.0
Gateway 192.168.1.254
DNS should be 192.168.1.254(If you know how to do the above, skip to step 7, And don’t forget
when you have finished to change the IPs back to automatic,
which is the preferred setting for general use.)To change an IP address….
For Windows XP perform the below steps:
Start
Run
ncpa.cpl
Right Click on the Ethernet (LAN) Connection
Click ‘Properties’For Windows Vista perform the below steps:
Start
Search box type ncpa.cpl (hit enter)
Right Click on the Ethernet (LAN) Connection
Click ‘Properties’
You should see something like this (Vista one shown)…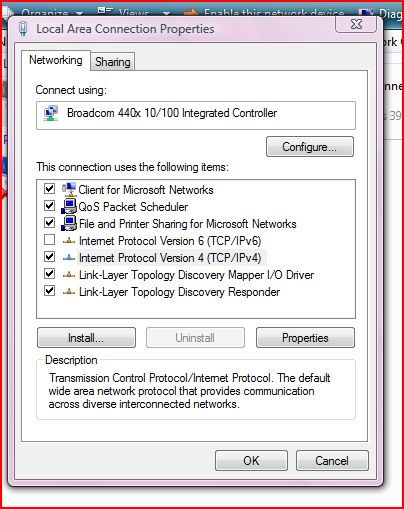
Then highlight the TCP/IP line (Or as shown here in Vista the IPv4
line) and hit Properties.The following screen allows you to type in suitable addresses.
RESTART the PC to obtain the new IP addresses. - Turn off your PC’s Anti-Virus and Firewall.
- Explore the USB stick and in XP double-click the StartBTrecovery.exe
file.
N.B. In VISTA right-click on it and run it as Administrator! - If at any time it asks you for your username and
password, because you factory reset the router, it will be
admin and admin if you are on 6.2.6.C or
older, but admin and xxxxxxxx (what you changed it to in
step 3) if you are on 6.2.6.E or later. - Click next wherever it suggests you continue.
-
The status bars gradually move across to 100%.
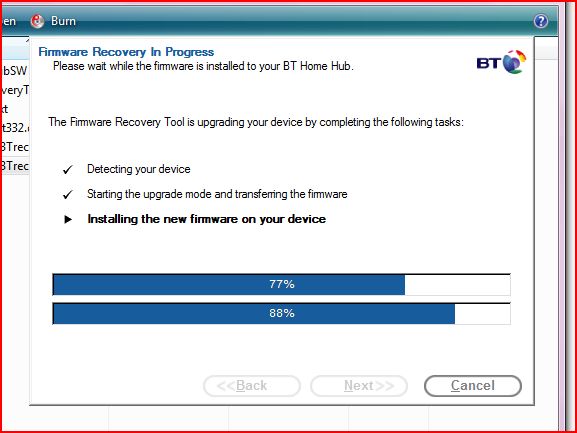
Then the finished (or non-critical fail) message is shown and the hub
reboots, lights flash, and it settles down as it you would expect it to
after a normal switch-on.You may get a non-critical error message to say the process has failed. Don’t
worry – provided the status bars moved slowly to 100% you will be OK. Just
reset the hub.However if you find the status bars jump from about 16%/18% to 100% complete
during the Starting Upgrade and Transferring part, then gives
a failed message but then does nothing else it’s probably the
filename length
problem. Unzip the tool into a USB memory stick and retry.If the tool says it “can’t find a device”, try again, and if it
still fails, try Recovery Mode as described below.BT tell you not to use the tool without supervision from the Help desk (!!)
because frankly it is a bit flakey, but if you got this far you
should be someone who is not averse to trying all combinations til the
darned thing does work!Allow the hub some 5-10 minutes to stop flashing after the load of the
firmware then check the version by looking at the 192.168.1.254
address.
Do not switch off the hub til it has settled! - The BT instructions say to reset the hub now.
OK Time for a cup of tea.
Then Lock
Then use Telnet to firstly set up a root access, and
secondly to disable the upgrade monitor.
Just type the code exactly as you see it including the : and the “
etc.
Finish each line with the ENTER key. Be careful to type it in exactly as
shown otherwise it will not work. .
1. Telnet into the hub by doing a Start/Run/cmd to get a command line, then
at the C prompt type
telnet 192.168.1.254 [hit ENTER]
enter the standard name
admin [hit ENTER]
and standard password
admin [hit ENTER]
2. Create a script to set up a root account. At the prompt type each line.
Keep typing all in one line, just let the words wrap round, and the second r00t
has two zeros. Most cmd windows also let you Copy and Paste…
(NB jarvis3r is an example – use something different!)
:script add name = pwn command = “user add name = jarvis3r password =
jarvis3r role = root descr = r00t” [hit ENTER]
3. Run the script by typing
:script run name = pwn pars = “” [hit ENTER]
4. finish by typing
exit [hit ENTER]
5. Telnet into the hub again, this time using the new superuser account and
password
telnet 192.168.1.254 [hit ENTER]
enter the new superuser name
jarvis3r [hit ENTER]
and new superuser password
jarvis3r [hit ENTER]
6. Check that you’ve got root access by typing
user list [hit ENTER]
7. Type
cwmp config state=disabled [hit ENTER]
cwmp config periodicInform=disabled [hit ENTER]
config save filename=user [hit ENTER]
exit [hit ENTER]
That’s it – the hub shouldn’t be able to upgrade itself.
Reversing the Procedure
If it’s no better, a reset will take out
the lock (remember that if you need to reset any time!) and you can upgrade
again from the BT
firmware site using exactly the same method as the downgrade above.
Hub Recovery Mode
Most “bricked” hubs should reflash using the Kernel Recovery Method. If
the re-grade fails, or if you have a hub that will not run
any BT recovery tool, try the following…
- Close the firmware wizard
- Locate the “Wireless Association” button on the back of the Hub
- Press and hold the wireless button, and unplug the power.
- Keeping the wireless button pressed plug power back, wait a further
5s until the lights changes before releasing the wireless button. - The Home Hub is now in recovery mode. You now have 90 seconds to run
the upgrade/downgrade tool again
Use on other ISPs
Home Hub Forum member Minormadness has contributed this modified config file
which will give access to be broadband from O2 Only Root ID is
available – ID is “qwerty” and password is “asdfg”
Do NOT please write to me for instructions of how to make your own ISP work on
there – you will need to save the standard config file which you can save
from the Hub’s System menu immediately after completing the 6.2.2.6 lock
process (using the jarvis3r ID), compare it to the modified one from the above
link, and work it out for yourself! It’s called “hacking”!
Telnet Footnote
In your cmd/Telnet open window, you can either type in each command thus:
cwmp config state=disabled [hit ENTER]
cwmp config periodicInform=disabled [hit ENTER]
config save filename=user [hit ENTER]
…or you can add colons and copy/paste the full script
:cwmp config state=disabled
:cwmp config periodicInform=disabled
:config save filename=user
Copy the above with Ctrl-C, then in telnet window right click on blue header margin,
and click Edit > Paste
then hit [ENTER]
Acknowledgements
BT’s beta forum
Contributor “Keith Beddoe”
HomeHubHacks Howto
site
HomeHub forum
contributor “Minormadness”
Citations
“Thanks for the excellent instructions on how to unlock the home hub –
worked first time, no problem! ” Michael BW Feb 1st 2009 by email.
“I’ve just managed to set up my BT Home Hub V1.5 (Shiny black one) for a
new provider following your instructions. It had upgraded itself to the
latest version, so I couldn’t managed to get it to work for a non BT
provider. I’ve downgraded it now to 6.2.2.6 and reset it for new provider
and it bl**dy works!!!Thanks a lot! Please keep the good work going!
Kind regards, G.A.” (March 8th 2009 by email)
|
Page created by "Jarviser" & hosted by FileSaveAs. See the Jarviser Home Hub Index Page If you’ve found the content of this page of use, and want to say thanks, Jarviser’s charity of choice is Great Ormond Street Hospital. Please visit their site to make a donation Got a question about the BT Home Hub? Please ask in the FileSaveAs Home Hub Forum Disclaimer: Content on this page was not originated by FileSaveAs, and is hosted ‘as-is’ as a service to Home Hub users. FileSaveAs accepts no responsibility for the content on this page. Visitors use information on this page at their own risk. Contents may not be reproduced without permission. Original copyright for content on this page rests with Jarviser unless otherwise stated. FileSaveAs Site Terms apply. |