|
This page was originally part of the Jarviser Home Hubs Files. They are now housed here at FileSaveAs to help users of the BT Home Hub. |
Printing this article: if it does not page properly, print in sections or try latest Opera browser for Windows which seems to behave better.
June 2010
Some common problems and fixes in the BT Home Hub, in association with the guys at the
Home Hub Forum.
1. How to register a Hub phone without using the Cradle.
2. How to access home network camera from the internet
3. How to set up a Windows Network on Home Hub
4. How to use a 1010 hub phone on V2 hub
5. How to use a 2.1 hub phone on an old hub
6. How to force hub to use same IP addresses each time
7. How to fit a BT master socket
8. How to change the IP range in a V2 hub
9. How to make Yahoo mail remember your login details
10. How to safely dispose of, or sell, a Home Hub
More How-to’s (1)
More How-to’s (2)
Home Hub (V1) Manual
New Home Hub (V1.5) Manual
1. How to register a hub phone without using
the cradle.
Suitable for 1010, 1020 and 2.1 phones.
First: if you have a 1010 or 1020 ophone, de-register it first
If you have a 2.1 ophone you can’t de-register it stand-alone.
So for 1010 and 1020 phones only…
On the handset take a look at which button is the “Menu” button.
Take off the battery cover and remove one battery.
Hold in the Menu button while reinserting the battery.
After a few seconds the display will show “TEST MODE”
Do NOT press OK, but press “5”
The display will change to show “CLEAR SUB”
Hit OK and the handset will deregister, but the phone book will be
retained.
Next: for all BT hub phones…
Whether or not you have de-registered the phone, when it’s switched
on the handset will say “Please register the handset to the BT Homehub”
Do
NOT press OK! – Instead press the
Back (RH) button
Press Menu button
“Register Handset” should be highlighted so click on “OK”
Select Base 1 (which should be free as you just de-registered the
handset) and then hit OK.
The handset asks you to put the Home Hub into registration mode by
pressing the Wireless association key on your Hub for three
seconds until lights start to flash.
Hit OK on the phone.
Handset then says System Pin – enter 0000 and hit OK
Handset says registering Handset Please Wait, or similar.
The handset will say ‘Handset registered’ when successfully
registered.
If using 1010 phone on V2 hub, reboot the phone handset by removing a
battery again, count 5 and re-insert the battery without pressing any
buttons this time.
Resetting to defaults: On 1010 handset menu “Base Settings” there is
a reset to “Defaults Settings”. I have done this twice now and the
phonebook is NOT lost, so you can precede the above with a full reset if
you wish and not lose the phonebook.
2. How to access a network camera externally
Following many requests to access a network webcam from the internet, that is
connected by ethernet to the Home Hub, rather than a webcam connected by
USB which is a different matter altogether. The following is developed from a response
by contributor “Ned Ludd” on the Home
Hub Forum and is principally for V1 and V1.5 hubs on 6.2.x.x
firmwares. Other routermodems use a similar method.
V2 hub has a different app sharing routine but just follow the same
principles.
IP cameras all seem to rely on the same methodology to be seen
outside the LAN. They need a permanent external IP address. To us mere home users,
that is not normally available because you get a different IP address
every time you connect to your ISP (unless you are a Business Customer),
so we have to resort to work-arounds.
So, get yourself a free alias WEB address from the likes of www.dnsalias.com
or dyndns.com
and that problem is solved. They will issue you with an alias web address, like
jarvisers.homeip.net or similar.
The Hub has a facility for informing DynDns
when your IP address changes and you will need enter the details of your
DynDns provider in there.
Now, you will have to open ports to the web for the IP camera so that
incoming traffic can be directed to the camera only and not all your PC’s.
On the Hub, you will have to open the Web Server port 80 so that the camera
can send data and a specified port for the data to be sent by.
The specified port may be fixed on the camera, or you may have to
nominate it. If you can choose the port then pick something easy to
remember like 22222 or 55555! Theses are high enough up the range so should
not be already used by existing items.
The important thing here is that you tell the Hub the same port
number that the camera is set for.
On the Hub, your camera will be discovered and, if the camera
firmware has one, it’s name will appear on the list of devices on the Hub
home page. It may just appear as an Unknown device in which case you alter
it to something meaningful e.g. IP camera! Also, be sure to tick that box
that ensures that the LAN IP address does not change.
If your camera already has a fixed IP address (see camera
documentation) then you MUST add that to the Hub. Go to the ‘IP Addresses’
on the Hub and add the IP address into the top section marked ‘IP
Addresses’.
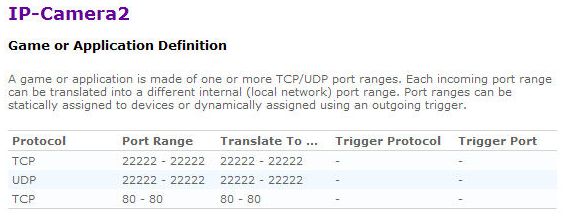
Now comes the touchy part. Within the Advanced section of the Hub you
will find ‘Application Sharing’ and ‘Create a new game or application’.
Open that bit and change the name from ‘New_entry’ to something like
IP-Camera2 (no spaces allowed) and select ‘Manual Entry of Port Maps’ at
the botton. Then click on next. Select the Protocol TCP, enter the port
range 22222 – 22222 then click add. Do the same for port 80.
Then do it all again but with the protocol set to UDP (not port 80 as
that is TCP only).
You will have 3 entries TCP 22222; UDP 22222; and TCP 80; The pic
shows the 3 lines. Click on Save (or whatever comes next). That’s it!
You’ve setup the port openings.
Now, click on ‘Application Sharing again. This time
select your entry from the ‘Game or Application’ drop down and select your
device from the ‘Device’ drop down. Click on whatever it wants for
confirmation.
Now, you’ve ‘opened’ the ports to the device. Be aware, the ports
will only be open when the device is powered up and connected to your LAN.
It’s also a very good idea if using a non-BT routermodem to disable remote management
and use passwords other than the default otherwise someone may be able to get
into your network!!
Now, here comes the last bit – click on Dynamic DNS and enter in your
details. (It may take a couple of hours to be recognised)
Access the camera on http://yournewaliasname[portnumber]
e.g. http://jarvisers.homeip.net[22222]
Congratulations! You’ve done it. If it doesn’t work, please, please
go through all these instructions with a fine toothcomb because they do
work. Also, some have found that rebooting the Hub followed by rebooting
the camera has cleared any blockage for them.
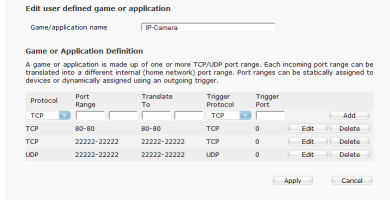
Here is a pic of the Hub V2 settings for a similar setup (Thanks
Ned!) but BE WARNED Hub v2.0 are unlikely to be successful thanks to thoughtless
design and poor firmware changes, not to mention two completely different designs
of V2.0 (Types A and B). If you are
successful please email me the details!
3. How to set up a Windows Network on the Home
Hub
This is really a Windows subject and is documented in many places
(Google is your friend!) but here is an extract of what I have posted on
the Home Hub Forum. It should work for a mix of Vista and XP, or all Vista
or all XP:
(NOTE Oct 2009: WINDOWS 7 uses a special Homegroup method for networks that are 100%
Windows 7, but try the method I describe for Vista when you have a mixed XP/Vista/Win7
network, except the sharing options for Win7 are now in “Avanced Sharing Settings”
in the Network and Sharing Center screen.
First thing is to get all your PCs connected to the Home Hub either
by Wifi or by Ethernet. Check that each one can see the internet.
Then if you have a third party Firewall (like Kaspersky Internet
Suite, Norton 360 or even ZoneAlarm, is to set up the Home Hub connection,
or the subnet 192.168.1.1 thru to .254 as a Trusted Domain. This will vary
with the various firewalls, but ensure the setting includes all the used IP
addresses.
Also you should set up all machines to force logon with a password.
If you have any PCs set up with no password for convenience, or set for
automatic logon without the password screen, you may not get enough
authentication to get onto another machine, especially onto the Vista
machines from an XP machine.
Then set up the network:-
In Vista machines
in Control Panel, Classic View, Network and Sharing Center, Sharing
and Discovery, you should set the network to type of “Private” which opens
up all the options to those below, or manually set them as:
Network Discovery On File Sharing On
Public Folder Sharing On
Printer Sharing On
Password Protected sharing Off **
Media Sharing Off
Workgroup left as WORKGROUP.
In the XP machines:
Run the Small Office Network wizard (NOT the set up a wireless
network wizard as you are already connected to the hub which is all the
connectivity you need). With both machines connected to the internet the
wizard should recognise the connection and recommended a configuration
option.
Change the XP machines’ workgroup to match the others, i.e. WORKGROUP
as per the Vista ones.
Sharing Files.
On XP PCs you need to declare certain folders as shared by
right-clicking on the selected folders in Explorer and setting them as
shared.
On Vista you can simply move files to the Public folder for anyone to
share, or you can right click on any folder, as with XP, and nominate users
to share.
IP Addresses:
Both machines should have IP addresses set on automatic, or else in
the range 192.168.1.64 thru .237
with subnet mask of 255.255.255.0
and gateway and DNS both set at 192.168.1.254 as follows:-
For Windows XP perform the below steps:
Start
Run
ncpa.cpl
For Windows Vista or Win7 perform the below steps:
Start
Search
ncpa.cpl
In either Vista, Win7 or XP, Right Click on the desired connection.
Ensure the connection is enabled (It will have a “Disable” option)
Then click on “Properties”
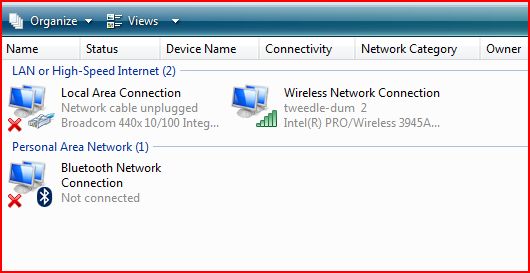
That will bring up the following screen. (Example shows wireless
connection on a Vista machine)
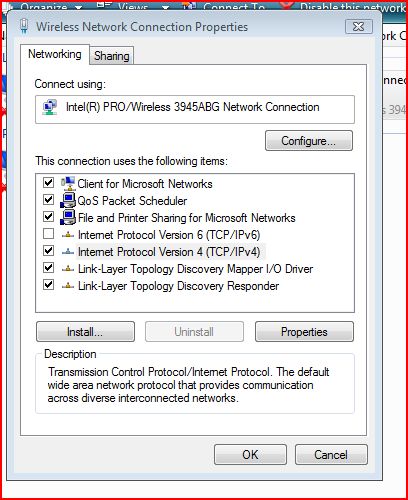
Then highlight the TCP/IP line (Or as shown here in Vista/Win7 the IPv4
line) and hit Properties.
The following screen allows you to click on automatic, or to type in
suitable addresses.
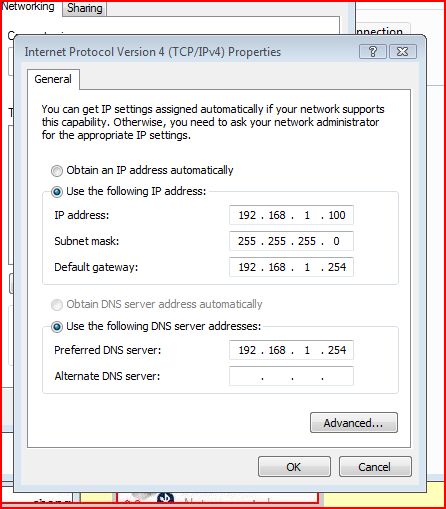
Select the automatic IP option as a preference!
With Version 2 Home Hubs any devices with a fixed IP may not appear
on the list of connected items.
RESTART the PC to obtain the correct IP addresses.
The network and file sharing should now work.
Note: If you have XP Home without SP3, you may not be able to “see”
the XP machine on Vista’s network map without running the patch from
http://support.microsoft.com/kb/922120on the XP machines.
If you still have trouble “seeing” the XP machine on the Vista
network map, despite having run the XP patch on the XP machine, try
browsing \\SHARENAME (type the actual Share name) or try to Map Network
Drive on Drive Z: against \\PCNAME then using Browse selecting the shared
drive.
Reminder! It helps if you set up all machines to force
logon with a password. If you have any PCs set up with no password, or set
for automatic logon without the password screen, you may have problems
getting onto Vista or Win7 files from an XP machine.
To use a
shared printer that is connected to another PC, the PC that owns the
printer must have printer sharing switched on. In Vista/Win7 it’s in the Network
and Sharing center (for Win7 its advanced sharing settings),
in XP its in Control Panel, Printers and Faxes and
after selecting the printer it’s the Share This Printer setting, then in
printers Properties click Share Name and OK.
To use the printer go to the Windows Add printer process but instead
of looking for a local printer, select Network Printer and look for the
printer in question and take the process from there.
If it still does not work write to Bill Gates not me.
4. How to use an old hub phone on V2 hub
If you have 1010 or 1020 hubphones from V1 or V1.5 hubs you can use
them on a V2 hub for basic calls with reasonable call quality, but no fancy
features. This is covered in the BT online help but there are a few
additional action that should help.
First de-register the handset back to factory settings. On the
handset take a look at which button is the “Menu” button.
Take off the battery cover and remove one battery.
Hold in the Menu button while reinserting the battery.
After a few seconds the display will show “TEST MODE”
Do NOT press OK, but press “5”
The display will change to show “CLEAR SUB”
Hit OK and the handset will deregister, but the phone book will be
retained.
The handset will now say “Please register the handset to the BT
Homehub”
Do NOT press OK! – Press the Back (RH) button
Press Menu (LH) button
Register Handset should be highlighted so click on OK
Select Base 1 unless it has an asterisk next to it, in which case
select the next free base then hit OK.
The handset asks you to put the Home Hub into registration mode by
pressing the Wireless association key on the side of your Hub version for
three seconds.
Actually 3 seconds is not required on the V2 hub, simply press it
briefly, then when the light is flashing Hit OK on the phone.
Handset then says System Pin – enter 0000 and hit OK
Handset says registering Handset Please Wait, or similar.
The handset will say ‘Handset registered’ when successfully
registered.
Now reboot the phone handset by removing a battery again, count 5 and
re-insert the battery without pressing any buttons this time.
The above actions should leave the best available sound quality, but
you will not get Hi-Ds sound when you call another hubphone user.
You will be able to use the intercom between two old type hub phones,
and can call a 2.1 phone from an old phone, but the 2.1 phone will not call
an old hub phone 1010 on intercom.
If you want to keep the old hub you could always try the method of
getting phone to work on a
slave hubwhich should retain Hi-Ds.
Citation: I’ve just replaced my old BT HomeHub with the new v2 and wanted
to register my old 1010 Hub Phone to the new Hub (which had a new v2 phone with it).
I was delighted to find your instructions on how to do this and it works fine.
So now we have a hub phone upstairs and downstairs which is a big help.
So … just a thank you for taking the time to put the instructions online.
Much appreciated. Sandie B. (email Aug 2009)
5. How to use a 2.1 hub phone on an old home
hub
The only thing you need to do in addition to normal registration is to
find a version 2.0 home hub, register the handset to it, then in Contacts
menu change the phone book location from “Shared” to “Handset” and add at
least one contact. If you do not do this the Contacts feature will not work
at all and you just get “Not Available”. However if you use a new v2 hub
temporarily to set the memory to Handset and add one contact it will work
when you re-register to your older V1 or V1.5 hub.
Connect your PC temporarily to the Hub 2 with an ethernet cable to
de-register all handsets (in Advanced Settings, Telephony, Handsets.)
As soon as you switch an unregistered handset on, it asks you to
register it (Hit OK) and then asks you to press the Wireless association
button on your Hub. As you have an old home hub you actually need to hold
in the wireless association button (on back of V1 or on side of V1.5) for
three seconds until the light(s) start to flash. Don’t hold in the button
too long or you will go into MAC Address filter mode!
When the lights start to flash, hit OK again on the handset. If the
Handset says System Pin – enter 0000 and hit OK
Handset says registering Handset Please Wait, or similar.
The handset will say ‘Handset registered’ when successfully
registered.
Two type 2.1 phones will work as intercom, but Hi-Ds will not work
when calling another Hub user.
Warning: If you ever do a Full Reset of the handset, the contacts
feature will disappear and you will have to find another V2 hub and start
again.
6. How to make hub use same IP addresses each
time
Once the hub has issued an IP address to your PC or other devices on
the network, you can ask it to always use those same IP addresses whenever
it reconnects. This is of course cancelled if you reset the hub.
This is how to do it on a Hub V2.0. The older hubs are similar.
Hub Menu (bthomehub.home)
Settings (enter password)
Advanced Settings (hit continue to…)
Home Network
Click on the PC highlighted in blue (which if connected by wifi will
be named, or if by Ethernet it will be “Unknown-xx-xx-xx-xx-xx-xx” where
xx.. is the MAC number) Bottom of page click on “Always use this IP
Address”
Hit Apply
7. How to fit a BT master socket
First thing to say is, strictly speaking, this is illegal and you are
supposed to get a BT approved installer to do it. So this article is
intended for those people who insist on doing it anyway.
Never fit the old type of BT master, always fit the new NTE5A with
the removable user-accessible lower half of the front plate so you can add
extensions at a later date without disturbing the BT incoming wires.
Without a BT designed master socket there is no over-voltage protection for
their exchange, so BT really should fit them for free – but they rarely do
and it may cost over £150. You must have only ONE master socket in any
one house.
The only reasons for fitting a BT master socket should be that the
one you have is the old type and fitting extensions becomes problematic, or
it’s broken, or possibly terminals are dirty/green from damp or age. On
very rare occasions there seems to be no BT master, but often it’s because
you can’t recognise it. Usually though some numptie has done some DIY
extension wiring and dispensed with it.
If you go to this site
http://www.buzzhost.co.uk/you will
find some information about BT master and slave sockets.
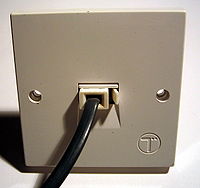
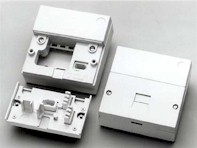
The old
type of BT master will look like this. Plain front (no join) with a single
BT jack socket, and either standard pattress size (size of a mains socket)
or the smaller compact size. The secondary or slave (extension) type socket
will look exactly the same – the difference is inside.
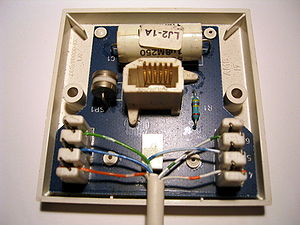
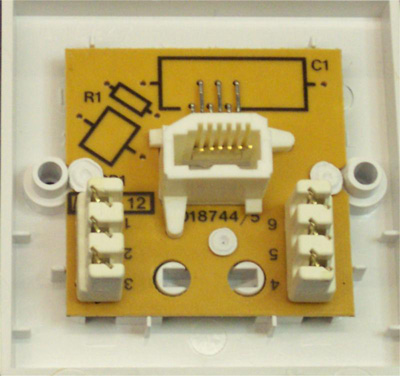
In the pics below, the master is on the left with the electronic
components, the slave on the right with just holes where the components
might have fitted.
(Pics from the web including Wikipedia).
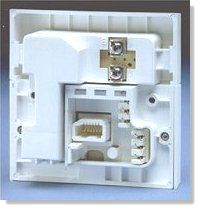
The new type of BT master will look like this. If it says BT at top
left it’s plain, if it says Outreach it’s made since 2007 and it has a
bellwire filter. If you search EBAY you should find both types of NTE5A
socket for about £5 to £10 at the most. If you currently have an
old small master socket you may need a “surface mount pattress box” from a
DIY shop to mount the NTE5A onto.
To locate your master try to look where the wires come in from the
pavement or the telegraph pole. Look out for wires up the outside of the
wall, in the loft, along skirting, under carpets, wherever you think they
may be. It should be the first socket in the chain, usually but not always
the nearest to the “incoming” BT wires. There may be an old oval grey or
white junction box first with the master the next in line.
The nightmare scenario is where wires come into the loft from the
street to an oval junction box, or even a lashed up join with insulating
tape, then fans out across the loft and drops down to various rooms. In
that case all rooms may have a master. This is known as “Star Wired” and
dates usually to the 1970 -1990 period when extensions became popular.
The aimed-for scenario is to have a single BT NTE5A master socket
(linebox) as the first socket after the wires come in from the street.
The first extension is then wired from the removable lower half of
the faceplate, and further extensions are chained-off from socket to
socket. They can even be star-wired from that NTE5A master socket’s
removable front plate. You should wire the extensions together with all
four wires 2,3,4 and 5, but the connection from the master front plate
leading to the first extension should use ONLY wires on terminals 2 and 5
(see later for colour codes).
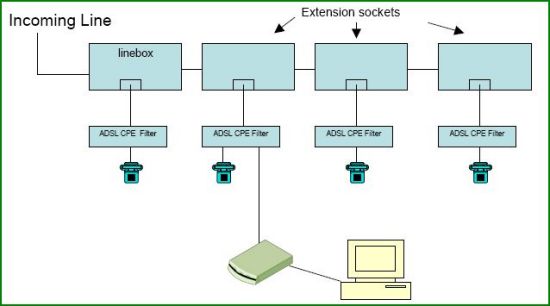

All phones or faxes or Sky boxes must have an ADSL filter between the
device and the socket as shown.
An old type master socket will typically have two wires coming in,
either on terminals A and B or numbered 2 and 5, and three wires coming out
to extensions from terminals 2,5 and 3. If you decide to leave your old
master in place you should disconnect any wire(s) on terminal 3 and tidy
them out of the way
As I already said, it’s supposed to be “illegal” to do the work
yourself, but very easy and will do no harm so long as the two BT “incomer”
wires coming in from the street are :-
– not earthed to ground (eg don’t let them touch the metal wall box),
– not touched with your bare fingers (you are a big interference
aerial),
– not allowed to touch each other (they can spark and make you
jump)
as any of the above can upset the exchange box (DSLAM) and drop the
profile speed for a few days.
So handle the wires by the
insulation and have some flaps of
insulating tape to cover the ends if you need to feed them through
any holes etc. Whilst they are insulated like that no harm can come to your
service, and anyone calling will just get a ringing tone as though you were
out.
Before disconnecting wires from the old master make a note of which
colour incoming wire was connected to terminal “2” and which to “5” .
Prepare
the new NTE5a master first then connect the two incoming wires onto
terminals A and B which are the two screw terminals shown on the pic on the
left. If your incomers are orange and white, connect white to A, but
whatever was connected to terminal “2” on the old master should be on “A” .
According to BT standards it does not really matter which way round they
go. Then rewire any slave sockets using standard “DIY shed” 4-core phone
cable and have them connect to the front plate of the new NTE5 master on
just terminals 2 and 5 which can then be plugged back in when complete and
checked. Leave the orange wires unconnected at the master end but reconnect
them if you move and take the ADSL filters with you.
Colour codes
for extension cables: terminal 2 is Blue with White spots, terminal 5 is
White with blue spots, Terminal 3 is Orange with white spots, but that is
the “bellwire” and should not be connected at the master end on a system
using ADSL with separate filters as it’s the biggest source of speed
zapping interference. By all means connect the bellwire at terminal 3
throughout the rest of the house extension sockets
BT incomer colours vary from decade to decade.
Or you can pay BT 199 quid to do it.
8. How to change the working IP range of a V2
hub
This contribution was taken from a posting by Olga Oakenfold in the BT
Beta forum. It was in response to a questioner where the user’s work VPN
used the same subnet 192.168.1.x as the Home Hub and the traffic intended
for the local network was redirected to the VPN in error. The answer is to
change the working range of the V2.0 Home Hub.
NB – Make sure you opt out of FON at bt.com/btfon, then reset the hub
to factory defaults.
Olga writes… “You can change the default IP address and DHCP scope
on the HH2 in
SETTINGS, ADVANCED SETTINGS, CONTINUE TO ADVANCED SETTINGS, HOME
NETWORK, IP ADDRESSES.
In my case this was set to 192.168.15.254/255.255.255.0, with a DHCP
scope of 192.168.15.1 to 192.168.15.199 (200 – 254 was reserved for the
devices that need a fixed address like printers and network drives).
You may get the message: “Are you sure? The IP settings you have
entered appear incorrect and might result in your computer not being able
to communicate with the Hub. If you wish to return to default values,
please select ‘No’ and use the ‘Reset IP settings back to default’ button.”
Basically all it is saying is you are changing you IP address of the
HH2 and if you don’t match this in the DHCP scope or hard code the PC’s
address to be in the same subnet then you will not be able to connect.
Also, dont worry about the default gateway. The PC’s will pick this
up in the DHCP reply and it will be the HH2. The default gateway off the
HH2 will be set/provided by BT when the broadband connection is established
back to the exchange (ie Provider supplied data/settings and you wont touch
these).
From the Windows command line I issued “ipconfig” : Note that the
default gateway and DNS receive the address of the IP range with .254
appended
Ethernet adapter Wireless Network Connection:
Connection-specific DNS Suffix . : home
Description . . . . . . . . . . . : HP WLAN 802.11b/g W400
Physical Address. . . . . . . . . : (deleted for security)
Dhcp Enabled. . . . . . . . . . . : Yes
Autoconfiguration Enabled . . . . : Yes
IP Address. . . . . . . . . . . . : 192.168.15.10
Subnet Mask . . . . . . . . . . . : 255.255.255.0
Default Gateway . . . . . . . . . : 192.168.15.254
DHCP Server . . . . . . . . . . . : 192.168.15.254
DNS Servers . . . . . . . . . . . : 192.168.15.254
192.168.15.254
Primary WINS Server . . . . . . . : 192.168.15.254
Lease Obtained. . . . . . . . . . : 12 February 2009 15:14:15
Lease Expires . . . . . . . . . . : 13 February 2009 15:14:15 ”
9. How to make Yahoo Mail and other sites
remember your login and password in Firefox
Some sites like bt.yahoo.com, where BT customers get their
emails, decide that your browser should not remember your login name and
password for “security reasons”. That is fine so long as you have the choice,
but Yahoo don’t give you that choice! The remember function is inhibited.
Although I get my BT mail via Outlook, I do occasionally have to log
into native bt.yahoo.com to reply to
emails that I receive on addressguard email addresses (and I don’t want the
sender to know my real email address). It annoys me that when I do use
Yahoo, the login screen does not remember my login details and I have to type
them in every darned time. I know you can
tick the “keep me signed in” box but it does not last for long.
I discovered this URL in an article in 5/3/2009 edition of *Micro Mart* magazine,
which contains a javascript script that will
bypass the restriction that Yahoo (or any other site) place on the login
dialogue box.
The script was posted in 2005 by idfubar in the MozillaZine site .
.
I used the script in the first posting on that forum.
Firefox users should create
a bookmark in your Firefox Bookmarks Toolbar, copy the javascript text and
paste it into the ‘location’ of the bookmark properties. When you are about
to login to bt.yahoo.com, before you type your login details click on the
new bookmark link, then when you enter the login and password you get the
familiar “do you want Firefox to remember this password?” which is normally
suppressed.
Next time you log in you just have to type the first letter of
the login and Firefox fills in the rest.
It does not seem to work on IE7.
It does work on Firefox and the Hub V2.0 admin password screen too!
As with all remembered passwords only do this on a
secure PC. Try it at your own risk of course, but I was happy with
it.
10. How to safely dispose of a Home Hub
I am not talking about environmental issues, what I mean is always
RESET the hub to factory defaults before disposal.
Why? Because if you have
BT Broadband Talk
configured, anyone picking up your hub and connecting a phone to it will have
free phone calls at your expense!
More Help
|
Page created by "Jarviser" & hosted by FileSaveAs. See the Jarviser Home Hub Index Page If you’ve found the content of this page of use, and want to say thanks, Jarviser’s charity of choice is Great Ormond Street Hospital. Please visit their site to make a donation Got a question about the BT Home Hub? Please ask in the FileSaveAs Home Hub Forum Disclaimer: Content on this page was not originated by FileSaveAs, and is hosted ‘as-is’ as a service to Home Hub users. FileSaveAs accepts no responsibility for the content on this page. Visitors use information on this page at their own risk. Contents may not be reproduced without permission. Original copyright for content on this page rests with Jarviser unless otherwise stated. FileSaveAs Site Terms apply. |