If your computer or laptop is a little sluggish, there are a couple of very quick fixes to give it a shot in the arm. In this short guide, we’ll give you the basics:
Step 1: Tidyup
Assuming you have a Windows machine, you’ll find it’s probably riddled with loads of temporary files and unnecessary programs. Lots of unwanted files slow down your hard drive access time, and one of the other main hogs is programs that run in the background, consuming valuable resources. Three things that are easy (and free) to do, are as follows:
- Remove any unwanted applications – Go to your Control Panel and from Programs, delete anything that you no longer use
- Install a free program called CCleaner. This scans your drives for unwanted temporary files created by Windows, your web browser and a number of messy bits of software
- Finally, have a look at the sheer number of programs that start when your machine does – it’s a safe bet that you don;t need all of these “vampire” apps that run in the background draining your memory. We recommend Windows Startup Inspector as a free, but slightly geeky, app that lets you disable unwanted crud.
Step 2: Upgrade
A few years back, the idea of taking the back off your desktop or laptop to replace the memory scared many, and required some solid knowledge of what you were doing. RAM upgrades were also fairly pricey. One of our recent projects here was upgrading some of our machines – a Compaq desktop, a Dell laptop and an ASUS notebook. It was both cheaper and easier than expected, thanks to a handy tool that’s free from memory sellers Crucial.com.
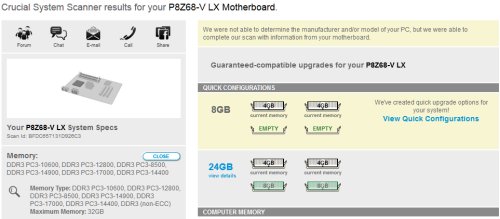
The System Scanner is a small application that scans your system to work out what memory is currently installed, and what the motherboard on your computer can support. It does an excellent job of detecting what you have, and offering options for upgrades. The scanner correctly identified our desktop, laptop and even our netbook and offered the correct options. For our desktop, the option selected was for a top-of-the-range update to the maximum supported memory, when we were looking for an incremental upgrade – it suggested binning the existing chips and replacing them, but the tool lets you see the various alternative options – and the right one for us was keeping the existing RAM and adding two additional chips. Here’s a screenshot of the tool in action:
It’s very easy to use, and even if you’re not in the market for a RAM upgrade, it’s worth a quick check to see what sort of figure you’d be looking at to get a system speedup.
Try the System Scanner for yourself here: Crucial RAM Upgrade System Scanner
As for the upgrade itself – very straightforward. The laptop was a case of removing a single screw and replacing two chips – the netbook was also straightforward. The desktop upgrade was OK too, but the angle of attack for the RAM slots as a little tight, as there’s quite a lot packed into a fairly tight space – nonetheless, easyish, and fast.
Without this kind of tool, it’s very easy to pick the wrong sort of memory, as there are lots of different memory types and configurations – Crucial’s tool makes it very easy, and it’s well worth a try. We’re pleased to report that since the upgrade, all three machines are buzzing – especially the laptop that we use for in-the-field podcast recording. The RAM from Crucial was also almost half the price that the laptop’s maker Dell was trying to sell us, proving that (here comes the pun), it’s “crucial” to shop around.
Any comments on suggestions on speeding your machine up, please let us know in the box below.
Related links:
- For more, see our PC Memory Updates page
Assuming your OS can handle the extra memory. I have 4GB on my Win7(32) machine, but there’s little point in adding more as it can’t address it:
http://msdn.microsoft.com/en-us/library/windows/desktop/aa366778%28v=vs.85%29.aspx#physical_memory_limits_windows_7